
For my last mashup assignment of the week, i went bold and chose the “Lip Read!” assignment worth 4.5 stars. I’ll be honest here, i chose it because it was worth 4 stars and i didn’t want to have to complete 2 more assignments worth 2 stars. BUT! I did enjoy making this. Since i have one more tutorial to do, i have decided to do it with this assignment.
Background
My last assignment had to be about The Wire so i had to sift through some good scenes. I was going to choose a different scene but i felt that the scene where Avon and Stringer fight was a good one. Every one has seen it and it’s a big moment in the show. After i chose the scene, i had to get a copy of it!
Tutorial
The Scene
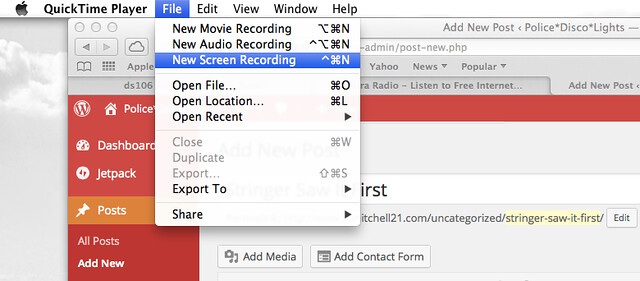
The first step in the process was getting the scene. Since i had to dub over the voices, i decided to use my Quicktime Player and just record the screen. I didn’t feel the need to go through MPEG and cut the scene to what i needed because the audio would be lost anyways. If you have a mac, you need to go the launch pad and choose Quicktime Player. Once you have that, you want to click “file” and choose “New Screen Recording” like below. Once you open that up, QuickTime allows you the option of doing the whole screen or dragging a certain section of it. Do whichever works best!
IMovie
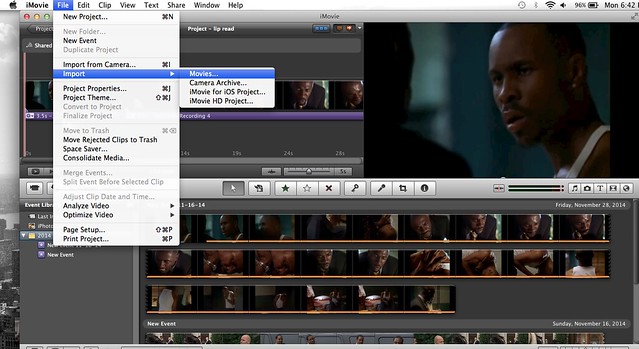
For this assignment, i used IMovie because it comes free with my Macbook. After i saved the screen recording, the next step was to open it in IMovie. Once you open IMovie, you need to also open your video screen recording so you can work with it! Now you have the video open and you can work with it! The next step is to dub over the voices!
Adding Audio
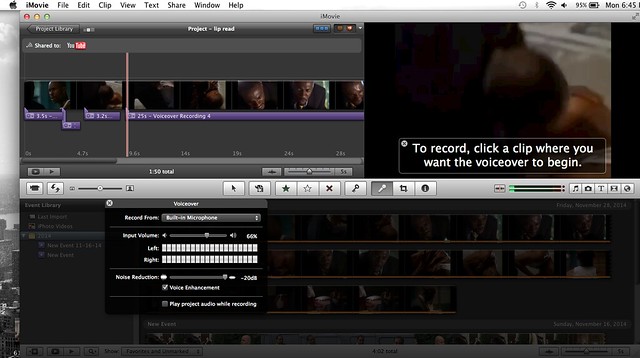
After you’ve open your video clip, you need to dub over the voices! With IMovie, it’s very easy. On the bar that divides IMovie into two different sections, there are some icons you can use for editing. One of them is a little microphone which will be used to adding in audio. Once you click on the microphone, IMovie tells you to click where you want to start recording the audio. It’s not too difficult! You choose where you want to begin and click, then once you’re done you click again and it will stop. Once you have all your recordings done, you’re new movie is ready for finalizing!
Finalizing and Uploading
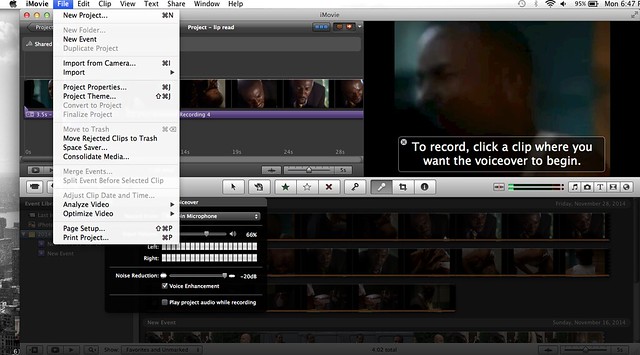
Once you’re pleased with your work, your next and almost final step of the process is finishing up the video and uploading. This is the easiest step! You head over to the “File” tab and scroll down until you see “Finalize Project”. This should be in bold and will allow you to click on it. Since i already completed mine, it won’t let me do it again which is why it is grey.
After you have finalized the project, you’re ALMOST done! If you have a YouTube channel you can upload directly from IMovie. What you must do is go under the “Share” tab and you have the option of sharing the video on various websites. Once you decide where you want to upload it, you will need to sign in to the website. Now you’re done and you can have all your friends see you work!

Here is my actual video!
Stars:4.5